Drawing a Stage Floor Plan to Block a Short Scene
About this lesson
In this 50-minute Grade 6 drama lesson, small groups sketch a bird's-eye floor plan of a taped-out stage. They draw arrows to show where actors move on each line, then perform a short open scene using their plan. Students learn stage directions and how movement helps tell a story. You need chart paper, markers, rulers, masking tape and a few chairs.
- Grade
- 6
- Subject
- Drama
- Time
- 50 min
Objective
Students will design a scaled stage floor plan and apply stage directions to block and perform a short scene, explaining how their movement choices show character and story.
Materials
- Masking tape to mark a 4 m by 3 m stage area on the floor
- Chart paper (one sheet per group)
- Rulers and pencils
- Coloured markers
- Two or three classroom chairs to use as set pieces
- Whiteboard and markers
Hook
Before class, tape a 4 m by 3 m rectangle on the floor and mark one long side as the 'audience' side. Ask two volunteers to stand in the stage area and say 'Did you hear that?' twice. The first time, both actors stand still and face the audience. The second time, one actor slowly backs away from the other. Ask the class which version told more of a story and why. Explain that today they will plan movement on paper, the way directors and designers do.
Main Activity
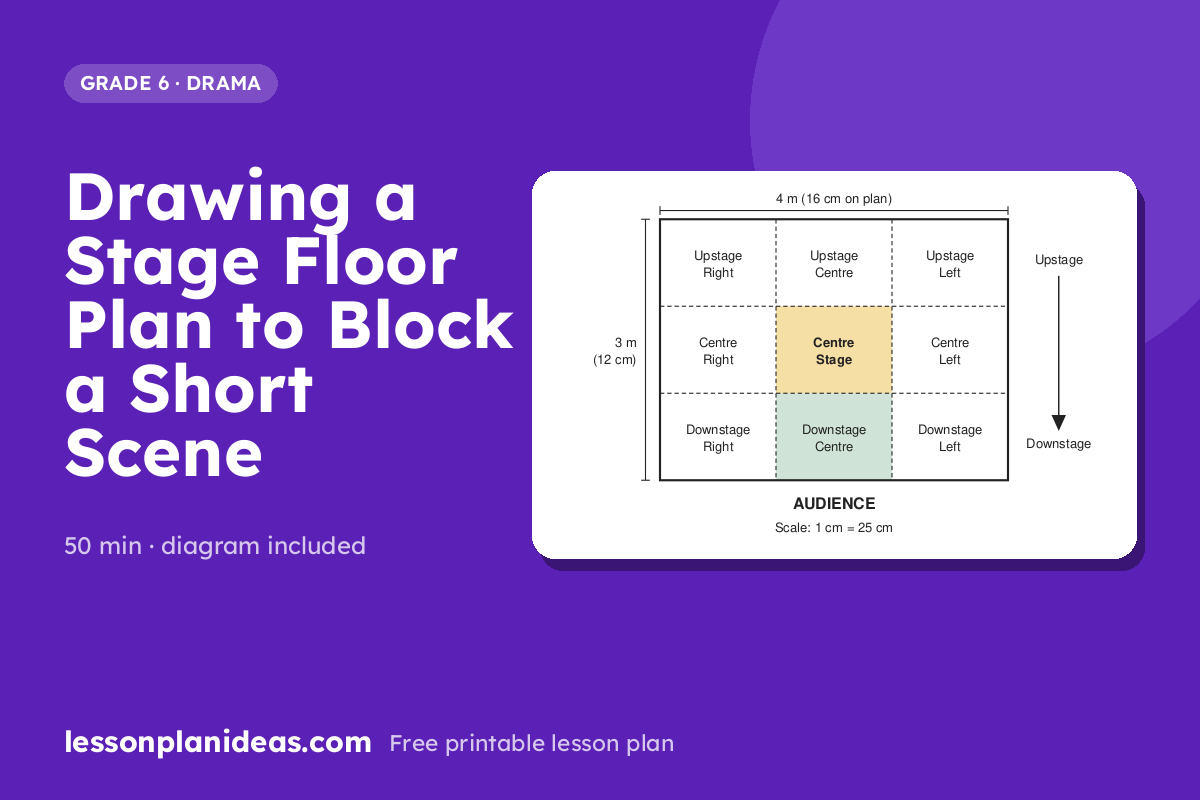
First, draw the stage on the whiteboard and label the nine areas: upstage left, upstage centre, upstage right, centre left, centre stage, centre right, downstage left, downstage centre and downstage right. Remind students that left and right are from the actor's point of view facing the audience, and that downstage is the side closest to the audience.
Next, write this open scene on the board:
A: Did you hear that?
B: Hear what?
A: Someone is here.
B: You always say that.
A: This time I mean it.
B: Then let's go.
In groups of three (two actors and one director), students use a ruler to draw the stage at a scale of 1 cm = 25 cm, which makes a 16 cm by 12 cm rectangle. They decide on a setting, such as a kitchen, an attic or a bus stop. They draw and colour the set pieces from above, mark an entrance, and draw numbered coloured arrows (one colour per actor) to show where each actor moves on each line. Groups then rehearse on the taped stage, with the director holding the plan and checking that the actors follow it. Finally, each group performs for the class while holding up its floor plan so the audience can compare the drawing to the action.

Discussion Questions
- How did moving closer to or farther from your scene partner change what the audience thought about your characters?
- Why might a director place an important moment downstage centre instead of upstage?
- What changed between your drawn plan and what actually worked when you rehearsed on the stage?
- How did your choice of setting affect where you placed the chairs and how the actors moved?
- If you performed the same lines with completely different movement, what new story might the audience see?
Exit Ticket
Draw a small rectangle stage and mark an X where you would place the most important moment of a scene. Write the correct stage direction name for that spot, and write one sentence explaining why you chose it.
Differentiation
Support: Give struggling groups a pre-drawn 16 cm by 12 cm rectangle with the nine stage areas already lightly labelled. Limit their plan to three movement arrows instead of one per line. Pair them with a 'stage direction cue card' on the whiteboard that shows an arrow pointing toward the audience labelled 'downstage'.
Extension: Advanced students add a lighting design layer to their floor plan. They use coloured pencil shading to show which areas are bright or dim during the scene, and they write two to three extra lines that continue the story. They then block the new lines and explain how their light and movement choices build tension.