Drawing Particle Models of Solids, Liquids and Gases
About this lesson
In this 45-minute Grade 5 lesson, children observe a solid, a liquid and a gas, then draw particle models in measured boxes. They add movement lines and colour to show how tightly packed particles are and how they move. Students learn to explain the states of matter using particle ideas. You need paper, rulers, coloured pencils, a cup of water and an empty plastic bottle.
- Grade
- 5
- Subject
- Science
- Time
- 45 min
Objective
Students will create labelled particle diagrams that explain differences in particle arrangement and movement in solids, liquids and gases.
Materials
- White paper (one sheet per student)
- Rulers
- Coloured pencils or markers
- A clear cup of water and a wooden block or eraser
- An empty plastic bottle with its cap on
- Chart paper or whiteboard
Hook
Hold up an eraser, a cup of water and a capped empty bottle, and ask students which one contains matter. Squeeze the bottle so students feel the air push back, then pour a little water from the cup to show it changing shape. Ask, 'If we could zoom in a million times, what would each one look like inside?'
Main Activity
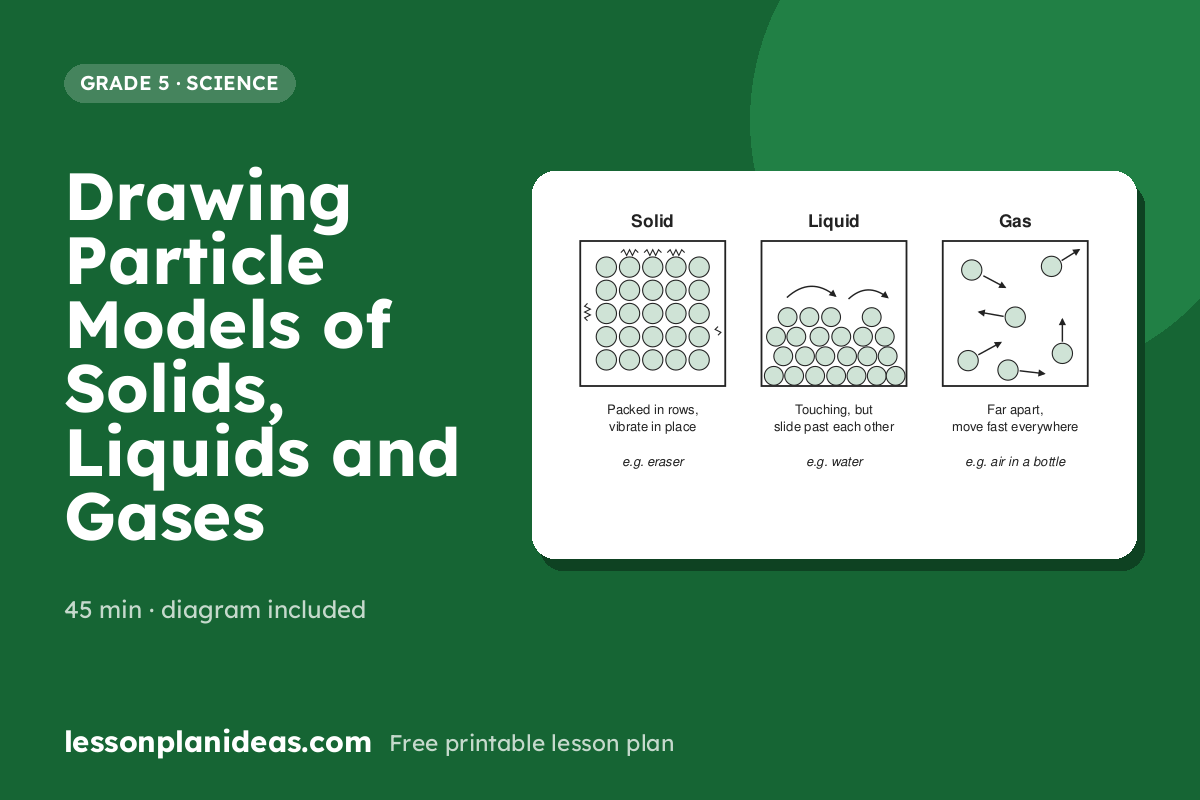
Explain that all matter is made of tiny particles too small to see, and that the state depends on how close together the particles are and how they move. Model on the whiteboard: solids have particles packed in neat rows that only vibrate, liquids have particles touching but sliding past each other, and gases have particles spread far apart moving quickly in all directions. Students fold their paper into three panels and use rulers to draw an 8 cm by 8 cm box in each panel, titling them Solid, Liquid and Gas. Using small circles of one colour for particles, they draw each model, then add artistic motion lines (short wiggles for vibrating, curved arrows for sliding, long zigzags for fast travel) and a colour key at the bottom. Under each box, students sketch one everyday example and write one sentence describing what the particles are doing. Finish with a gallery walk where students place a sticky note or written comment beside one classmate's poster that shows particle movement clearly.

Discussion Questions
- Why can you pour a liquid but not a solid, using what you know about particles?
- Why do you think the bottle of air pushed back when it was squeezed?
- What do you think happens to the particles in an ice cube as it melts?
- How did using motion lines and colour help you show something we cannot see?
- Which state was hardest to draw accurately, and why?
Exit Ticket
Draw a quick particle model of the steam rising from a hot drink, and write one sentence explaining how its particles differ from those in the drink itself.
Differentiation
Support: Provide a whiteboard reference showing the three models with labels, and give students a word bank (packed, vibrate, slide, spread out, fast). Allow them to trace circles around a coin or the end of a marker to keep particles a consistent size, and pair them with a partner to talk through each panel before drawing.
Extension: Students add two arrow panels between their boxes showing melting and evaporating, drawing the particles mid-change and labelling whether energy is being added or removed. They can then design a fourth panel predicting what happens to particles when a gas is cooled and condenses.